
5 min read ·
Use Polymer-Modified Thin-Set for Most Backsplashes
Choose backsplash thin-set by tile, backing and exposure. Compare modified, glass-tile, large-format and premixed options, then apply them correctly.
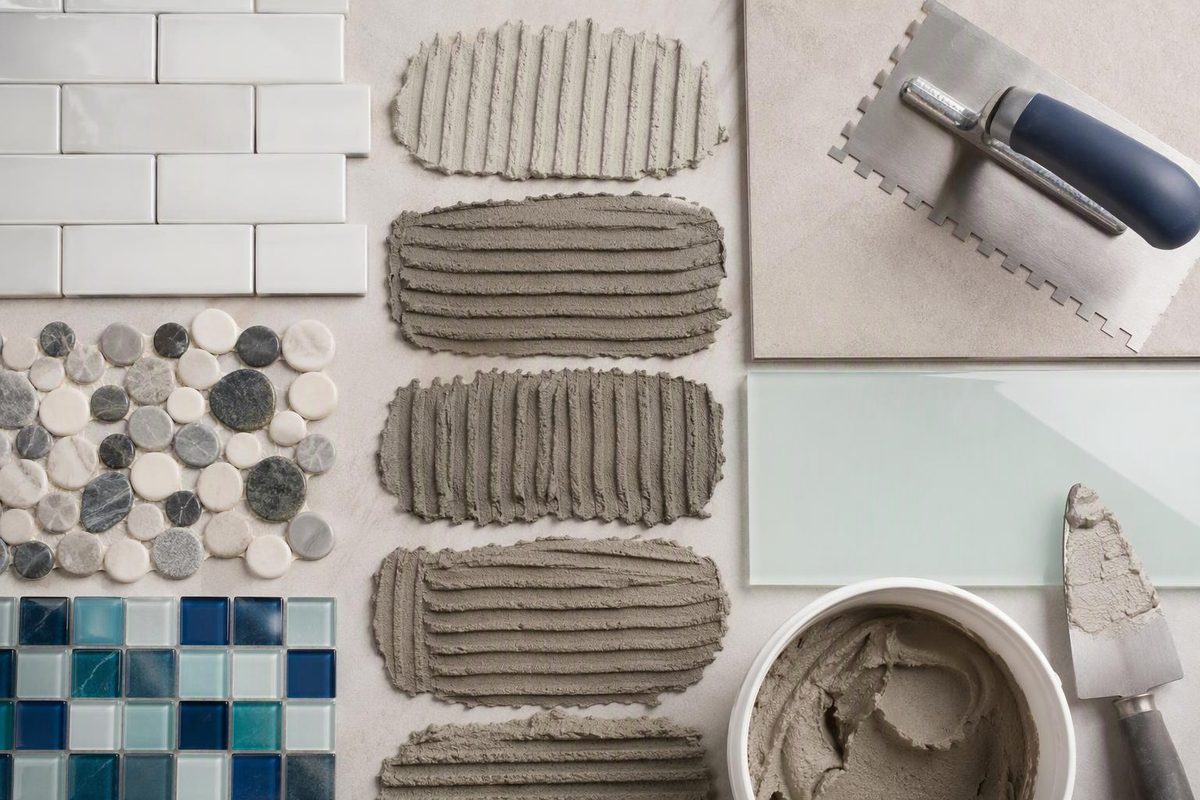
For most ceramic or porcelain backsplashes over sound drywall or cement backer board, start with a polymer-modified thin-set mortar meeting ANSI A118.4. White and gray both work behind opaque tile; choose white where light-colored stone, glass or another appearance-sensitive tile could reveal or be affected by the setting-bed color.
Use a mortar specifically approved by the tile manufacturer for translucent glass, moisture-sensitive stone, resin-backed tile or unusually large pieces. “Thin-set” describes a tile-setting mortar and method; it is not ordinary bricklaying mortar. See why thinset and masonry mortar are not interchangeable.
Select the tile, backing and exposure to identify the appropriate starting mortar and coverage target.
Backsplash Mortar Match
Use the result as a starting specification, then confirm the current mortar and tile data sheets.
Polymer-Modified Thin-Set, ANSI A118.4
White or gray can be used behind opaque ceramic tile. Confirm that the mortar lists gypsum wallboard in an interior dry area.
Coverage target: at least 80% average contact.
Match the Mortar to the Tile and Backing
| Material or condition | Starting choice | What to verify |
|---|---|---|
| Ceramic tile or mosaic | White or gray modified thin-set, ANSI A118.4 | Wall material is listed |
| Porcelain tile | Modified thin-set, ANSI A118.4 or A118.15 | Porcelain is listed |
| Clear or translucent glass | Bright-white glass mortar | Tile maker’s instructions |
| Large or heavy tile | Non-sag large-and-heavy-tile mortar | Tile size and bond thickness |
| Light natural stone | White modified mortar | No moisture sensitivity or resin backing |
| Sensitive or resin-backed stone | Specialty epoxy or specified system | Compatibility and staining risk |
| Membrane or proprietary board | System-approved mortar | Type and warranty terms |
A general-purpose modified mortar covers many ordinary installations. Custom’s VersaBond data sheet, for example, lists ceramic, porcelain, glass and natural-stone tile, as well as gypsum wallboard in interior dry areas. It separately directs installers to a dedicated mortar for clear or translucent glass and an epoxy mortar for resin-backed stone. The current technical data sheet matters more than words such as “premium” on the bag (Custom Building Products VersaBond TDS).
Glass deserves particular care. A dedicated glass mortar provides a consistent white background that does not unevenly shade translucent tile. Laticrete’s Glass Tile Adhesive Lite, for example, is an ultra-white, non-sag, polymer-fortified mortar meeting ANSI A118.15 and lists gypsum wallboard among its substrates (Laticrete Glass Tile Adhesive Lite). Follow the tile manufacturer if it requires flattened ridges, a particular membrane or a named mortar.
Premixed Adhesive Works Only in Listed Conditions
A ready-to-use adhesive can suit small tile on an interior residential backsplash when the exact product lists the tile, substrate and expected exposure. It is not automatically equivalent to powdered cement mortar. It hardens as moisture leaves the adhesive, so dense tile, nonporous backing, large pieces and high humidity can extend drying substantially.
Check the pail rather than relying on the phrase “premixed mortar.” MAPEI’s current Premium Mortar permits intermittent-wet residential backsplashes and tile up to 15 in. (38 cm), but limits glass to 6 × 6 in. (15 × 15 cm) in dry areas. It also warns that glass can take longer than 72 hours to set before grouting (MAPEI Premium Mortar TDS).
Custom’s AcrylPro recommends tile no larger than 8 in. (20 cm) on a side when normal drying time matters. Although it allows pieces up to 15 in. (38 cm) with significantly longer drying, it excludes transparent glass, resin-backed stone and nonporous waterproofing membranes (Custom Building Products AcrylPro TDS).
Powdered modified thin-set is therefore the more versatile default when the job involves a membrane, glass, porcelain, large tile or limited drying through the assembly—provided the chosen mortar is approved for every component.
Prepare the Wall Before Mixing
The substrate must be flat, rigid, clean and dry. Remove grease—especially around a range—along with dust, loose paint, wallpaper adhesive and other bond-breaking material. Repair damaged drywall and correct substantial humps or depressions by a method approved for the wall system. Thin-set should not be used to flatten a badly uneven wall.
Sound gypsum wallboard can be suitable in an interior dry area when the selected mortar lists it. Painted or glossy surfaces may require abrasion or other preparation under the mortar manufacturer’s directions. If a waterproofing membrane or proprietary tile board is present, use that system’s approved mortar rather than applying a generic modified-versus-unmodified rule.
Powdered cement mortar can contain silica and is alkaline. Read the product’s safety data sheet, avoid breathing mixing dust, protect eyes and skin, and use the specified gloves and respiratory protection. VersaBond’s instructions, for example, call for chemical-resistant gloves and a NIOSH-approved respirator for dust exposure (VersaBond safety and application instructions).
Set Tile for Verified Coverage
There is no universal trowel size for every backsplash. Tile dimensions, back pattern, wall flatness, trowel angle and mortar consistency all affect transfer. ANSI A108.5 calls for at least 80% average contact on interior dry walls and 95% on exterior or wet-area walls, distributed to support the tile.
A 1/4 × 1/4 in. (6 × 6 mm) square-notch may be adequate for tile up to 6 × 6 in. (150 × 150 mm), but it is only a starting point; actual coverage must be checked (Laticrete TDS 196). Small mosaics may need a smaller notch to limit squeeze-through, while larger or deeply keyed tile may need a larger notch and back-buttering.
- Measure the clean water and powder using the bag’s ratio. Mix at the specified low speed, allow the mortar to slake, then remix. Do not add extra water after slaking unless the instructions permit it.
- Use the trowel’s flat side to key a thin coat into the wall.
- Add mortar with the notched side and comb straight, parallel ridges rather than swirls.
- Set each tile while the mortar is fresh, moving it across the ridges to collapse them.
- Lift an early tile and check periodically. Increase the notch, adjust the technique or back-butter if coverage is short. If the mortar has skinned over and no longer transfers, remove it and apply fresh material.
- Clean the joints and tile faces while the mortar remains workable.
Observe the selected product’s stated wait before grouting. VersaBond specifies 24 hours as a guideline, while ready-to-use adhesives can require 24–72 hours or longer depending on tile size, porosity, temperature and humidity. The current bag or data sheet controls; “grout the next day” is not a universal rule.